Help on Navigation/Browsing Automation
Here we have an idea on how the browsing automation works in this software, and how to take advantage of its potential.
We have seen before that on the "Define Hosts" tab we can define the hosts to mass ping, whether through an IP address or a Mask, or by defining the first and last IP addresses, being these two options used on the creation of a host list through IP address ranges, or even using the "copy & click" functionality that allows us to copy a text to the memory and then with a simple mouse click extract hosts from it automatically.
But there is something with much more potential on Network Pinger, which is its capability to automate browsing/navigation to extract data. Sometimes we want to extract some hosts in a dynamical way from some web-page on the Internet, from tables or files. Lets imagine an ISP company, where its workers use a HTML table where they can select a cell full of clients and through it get an entire list with all the active clients at a given moment, with their data like IP address, MAC address, etc. Without automation, to ping all those hosts to check if there were some of them offline or not, we would have to copy the text, filter the IP addresses from it, put those on a special software, and start pinging them. On the Network Pinger software, all that can be done with a simple mouse click.
Not only there is the browsing automation, as there are also other easy ways to get IP addresses from a page. One of them is to tell the software to read a HTML table and download from it the hosts it contains and certain data. The other is used when the text where we want to extract the IP addresses isn't something organized as a HTML table, but instead something much more chaotic like the text of a simple tutorial, and in this case we could let the software filter the entire text searching the domain names and/or IP addresses to find.
This way, on the Saved Sessions tab, we have four main ways to make a session launch a mass ping window, one without automation, and other three with automated browsing.
Without Automation: To define a list of hosts without automation, we have to choose the "Manually Defined Range" option on the top box, and only by doing this we could have the desired options available. To make a session save an IP address list without being done in a dynamic way, there is on the right part of this tab's panel a way to define an IP range, whether through an IP address and sub-net mask, whether only through a starting and ending IP address.
With Automated Extraction: It's here where the functionalities we want to study in this tutorial are. Inside this type of automation, we have two options with or without automation. Before anything else, we have a mandatory field in this functionality which is the "File of Page Address" one, where we could put a simple address from a page or file on the Internet, or inside our network, or even in our local computer from which we want to extract the hosts to ping. We have also a field that would be used for us to put the proxy if needed, in case the page is only accessible through a proxy, something very common in some companies for security reasons. Lets study these two main sections:
"Without Automated Browsing (extract all)"
After we choose this option, we have the chance to put a check on two boxes, the "Extract IPs" and the "Extract Domains". We can have one of them or even both selected, saying to the software that it should extract domains and/or IPs from a page or file given by us. That extraction is done to the entire page or document, and the software would read its entire contents searching for domains and/or IP addresses to populate its list of hosts to ping.
"With Automated Browsing"
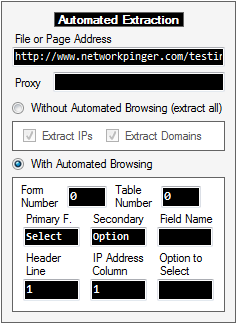 Here we can find the biggest potential of this tab. We have eight fields here to fill, but only some of them are necessary in one of the options. The eight fields are:
- Form Number - This field defines the number of the form on the page to be read that should be executed, being this parsed through the HTML form tags, in the cases in which there are HTML forms to submit in order to obtain the data we want. If we just want to read a simple table already ready to be read without submitting HTML forms and without any automation required, we should have the value "1" by default in this field.
- Table Number - Here we define the number of the table on the page to read. If it has only one single table, this field should contain the value "1". In the case it has for example three tables, and we want to select the second one, we should put "2" here, and so on.
- Primary F. - This option is just for browsing automation, when we want the software to select a certain option inside a field before submitting, it would be this option on the HTML file to define it. In the case the control we want is a Select tag, a HTML drop-down menu, this field should have the text "Select" inside.
- Secondary - This option is only used for browsing automation, when we want the software to select an option from a field, and that field would be defined as a secondary field which would have the name from the HTML option to select. In case we're talking about a drop-down menu in HTML, this field would have "Option" written inside. This way the software would select the correct "Option" tag inside the "Select" HTML control given by the user.
- Field Name - This field is where we should put the name of the option to select for automated browsing. This way, if we want the software to go to a given "Select" control to choose the "Option" with the name "test", we should put here "test", as we'll see on the practical examples given below.
- Header Line - This is a mandatory field in any occasion where Automated Navigation is used, and it exists for us to put the number of the table line which should contain the titles of the columns. Usually, we put the titles on the first line of a table, but we never know how the table creator thinks (there can be for example an empty line before the title line on a table), and here we can define which is the line where those table titles are.
- IP Address Column - This is another mandatory field in any occasion with Automated Navigation/Browsing, the field in which we would put the number of the column which contains the domains or IP addresses inside the table. This because the domains or IP addresses to filter from the table, could be not on the first column but instead on the second one, third, or another one.
- Option to Select - This is an option that is only valid when we want to use the browsing automation, and which makes that if we want something, the mass ping tool window when it is opened after we choose the session, goes for example to search a drop down "Select", from the given HTML form, on the page, and reads all the "Option" tags, until it finds the one that we wish and have saved on the field "Option to Select", and chooses that option in an automatic way. This way, if we have a page with 3 options, A, B and C, on the second website form, on a "Select" control with several "Option" inside, it will open the mass ping window, download all the possible options from the given form, and automatically select the option that we wish, something useful when we want a specific session to download and filter all the data automatically always from the same option to select.
This way we have two possible ways to download data from a HTML table, with and without automation:
- Without Automation: - Without automation is when we want the software to open a page or document and download data from a HTML table inside that page, without selecting any options and without letting the user select any options through the software in an automated way either.
In this case, the user only has to fill four fields: the "Form Number" will have "1" as value because there is none and it must have that value as default as such, the "Table Number" to tell the software which of the tables in the page should be read, the "Header Line" to tell which line contains the column titles, and the "IP Address Column" to indicate which column contains the IP addresses inside the table.
With these fields filled, the mass ping tool will already know how to read the table when launched, and the rest will be explained below. In this case, the mass ping tool window won't have the possibility to let any automated option to be chosen at left:
With Automation: - With automation would be on those cases that when a page is read require that some option is selected and some button clicked upon, in order to display the results, and on those cases the software will show the user on its own window to allow the user to select an option from those and to make the software download the host list in an automatic way by submitting the forms on the page automatically.
In this case, the user has to fill at least seven of the eight fields, with only one optional: the "Form Number" would have to contain the form number/position on the page, the "Table Number" to indicate which is the table of the page that should be read after the software submits the form to obtain the data, the "Header Line" to tell the software which is the line that contains the titles of the table that it will obtain, and the "IP Address Column" to indicate which is the column that contains the IP addresses inside the table, would be the first ones to fill.
Then, the "Primary F." would have the HTML control where the options would be, like for example the "Select" control if we're talking about a HTML drop-down menu, and the "Secondary" which would have the name of the tag that contains each option inside that control, in this case "Option" as each Select control would have several "Option" inside of it that the software would read. As the page that the software would read would have several controls like the "P. Field" (Primary Field), in this case several "Select" controls, we should clearly tell the name of that control, and such would be done on the field named "Field Name" where we would put that after the "name=" inside the "Select" tag in this case. Lets imagine that the page we want to read has the following HTML control from which we would extract the IP addresses by submitting its form:
IP Addresses:
<select name="ips">
<option selected></option>
<option>10.0.0.0/28</option>
<option>192.168.1.0/28</option>
</select><p>
In this case the "Primary F." field would have "Select" as a value, the "Secondary" would have "Option", and the field "Field Name" would have "ips" because after the name="ips" that's the name we have inside the Select tag. This way, the software, after launching the mass pinger window, would search the right form through the "Form Number" value, and inside of it would get the "Select" tag that would have "ips" as name (name="ips") as told on the "Field Name" field, and on that tag it would search through all options indicated according to the "Secondary" field, in this case through all the "Option" tag values, and put them on the mass pinger window itself at the left panel, so that whenever the user clicks on one of them, the software would download all the hosts and prepare itself to start pinging them.
In this case, when starting the mass pinger tool, its window would already have at its left panel a section destined to show the list of available options taken from the page, so that the user could with just a simple click on them, be able to download the hosts associated to them from the website automatically and start pinging, as we can see below.
At the example that was created to come by default with the software, we have the following page to serve as an example:
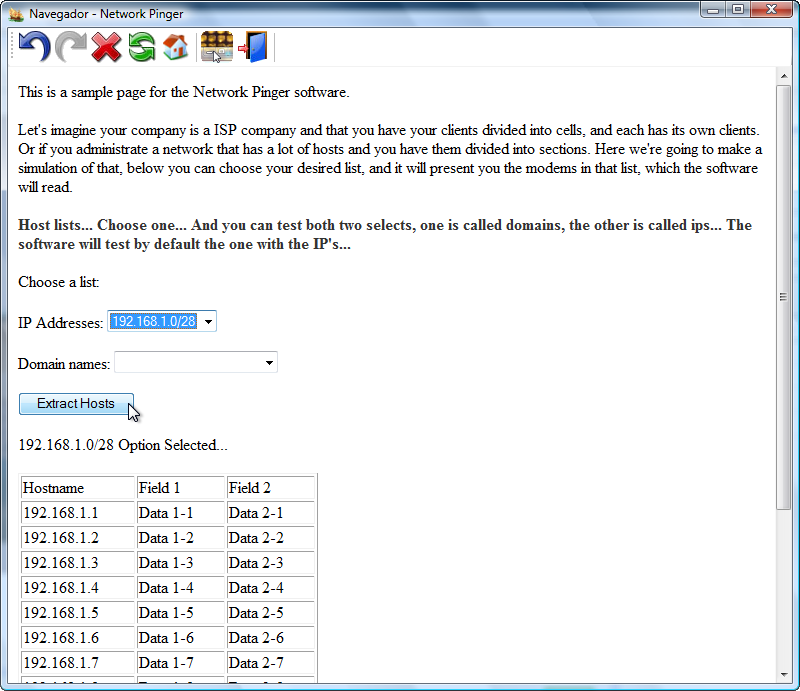
If we click on the image above, we would see the real test page, and on that page when we select an option on the drop-down menu (the one above or the other below), we obtain results after submitting the form. The software comes with two sessions by default that use this page to download data automatically as an example, the "automatedTableDN" and the "automatedTableIP", which both of them make the software go to the page and get the hosts from each one of those two forms shown above.
Its HTML code, if we see the HTML page example source code, is:
IP Addresses:
<select name="ips">
<option selected></option>
<option>10.0.0.0/28</option>
<option>192.168.1.0/28</option>
</select><p>
Domain names:
<select name="domains">
<option selected></option>
<option>Domains with Numbers</option>
<option>Domains with Letters</option>
</select><p>
The two sessions saved by default, will have this way as common data between them not only the page's address, but also the form number which is "1" because there is only one form at the page, and the table number which is "1", because after submitting the form the page only returns a single table and we'll read the first one which is that one that is returned, and we'll have also the value "1" as the header line (column titles), and the column which contains the hosts, and since the tables are equal, we will have also the values "Select" and "Option" as primary and secondary fields, because all the data in these forms are selected in drop-down menues created with the "Select" HTML control.
Only one field is left that will allow us to tell the software if we're talking about the drop-down menu from the domain names or the one from the IP addresses, which has the name "Field Name", which according with the HTML source code of the page shown above, one of them has the name "ips" and the other one "domains". It's through this field that the software knows which of those two different "Select" boxes is to be chosen and sees them as different, and in this example we have one giving us a list of hosts' IP addresses and the other a list of hosts in the format of domain names, for testing examples.
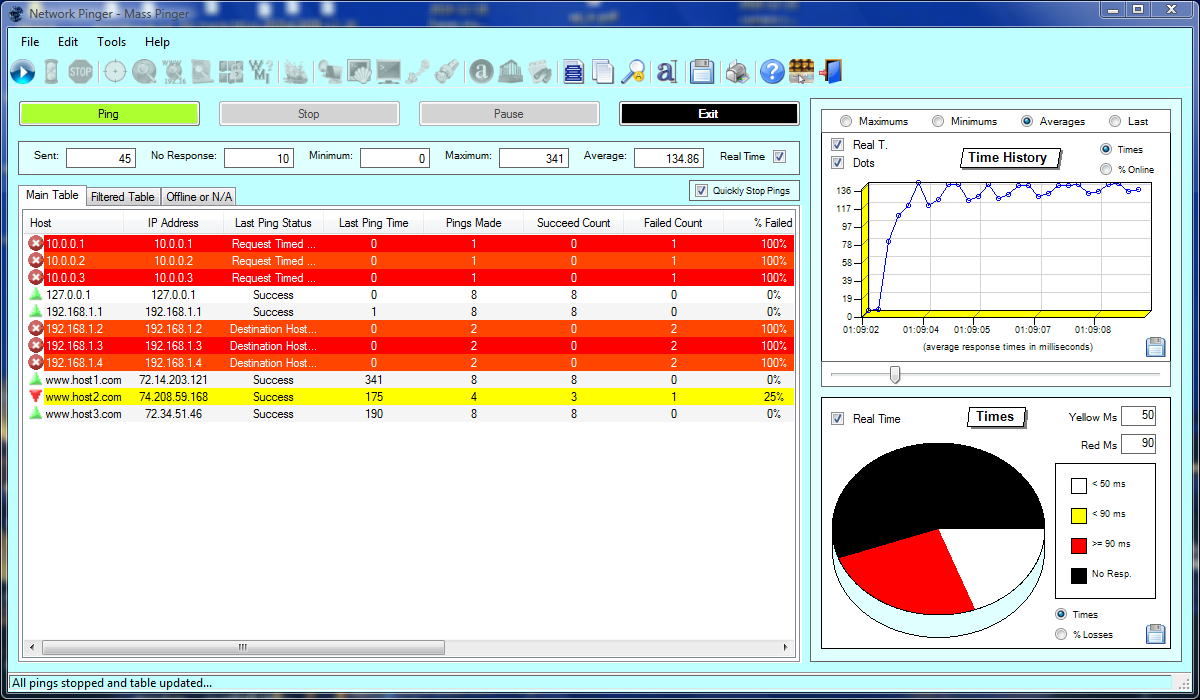
After selecting one of these two sessions, or another new one after creating it, and clicking on the "Start Pings", we shall have a new mass ping window opened, but this time with the section at left shown where the options available to be clicked taken from the drop-down menu we selected are, and at the image below we've chosen the domains drop-down menu, and then one of its options was clicked, the "domains with letters" one, and the table populated, and the pings started:
By putting "ips" instead of "domains" on the session's "Field Name", we would have the IPs available to be chosen instead of the domain names on the left panel that contains the options taken from the page to be chosen.
Extra Fields
Not only the software extracts the IP addresses or domains from the HTML table to present them on the software itself, but it also extracts all of the fields shown on the original HTML table to show them on the software. Why? Because they can contain important data related to each host on the table, and they are also good for sorting effects, problem detection, etc.
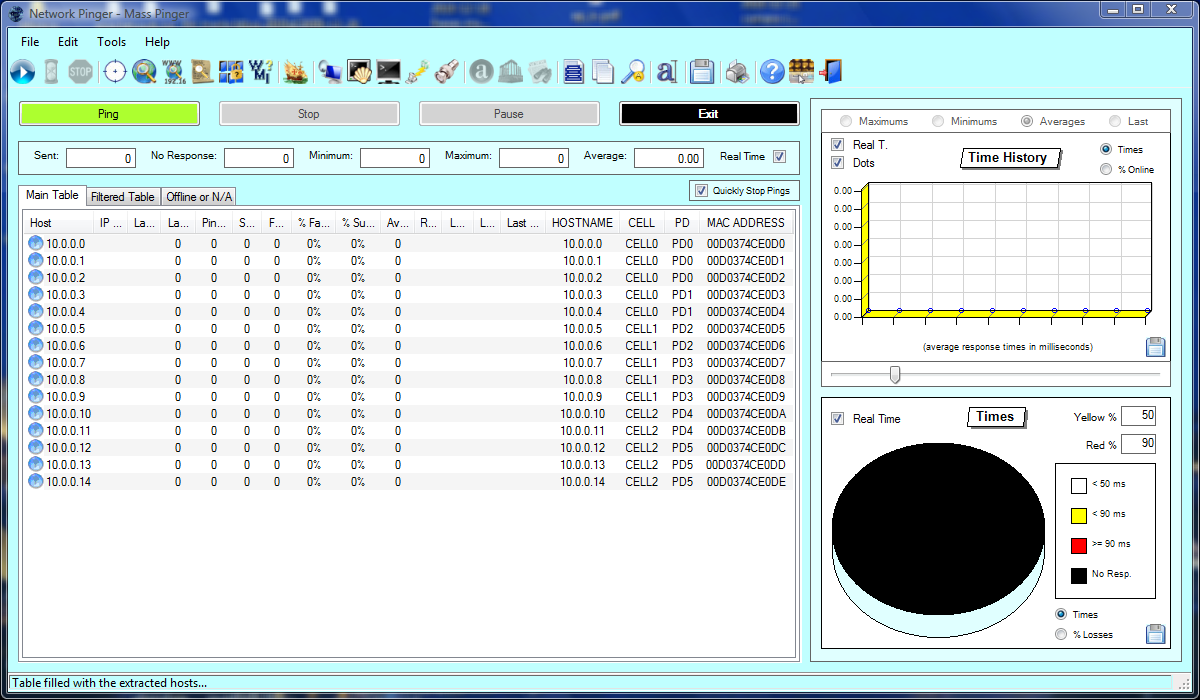
Lets see a practical example, which would happen on an ISP company in which each host would be inserted in a client cell, and each cell would have lots of PDs, and we would have also the MAC Address associated to each IP available. Lets see how a possible HTML table with this data would be, the one that we have already created for our example of a non automated table extraction:
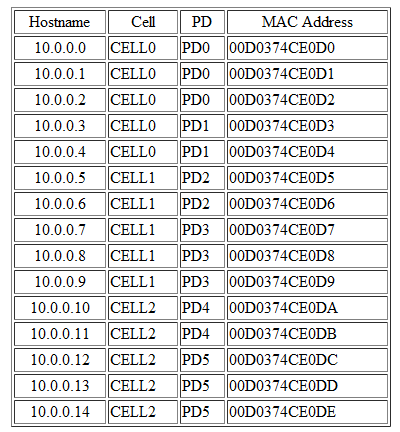
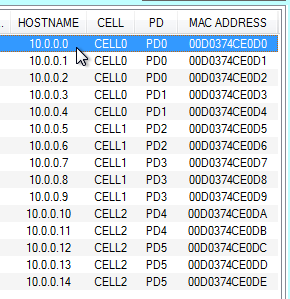
The table above is the table which was created for the example of a session with tables without automation that comes by default with the software, and it has several fields besides the IP address of each host, and simulates for example an ISP, in which each IP address has an associated MAC address, and belongs to a given PD, inside a certain cell, etc. The software will get those extra fields and show them on the mass ping table itself:
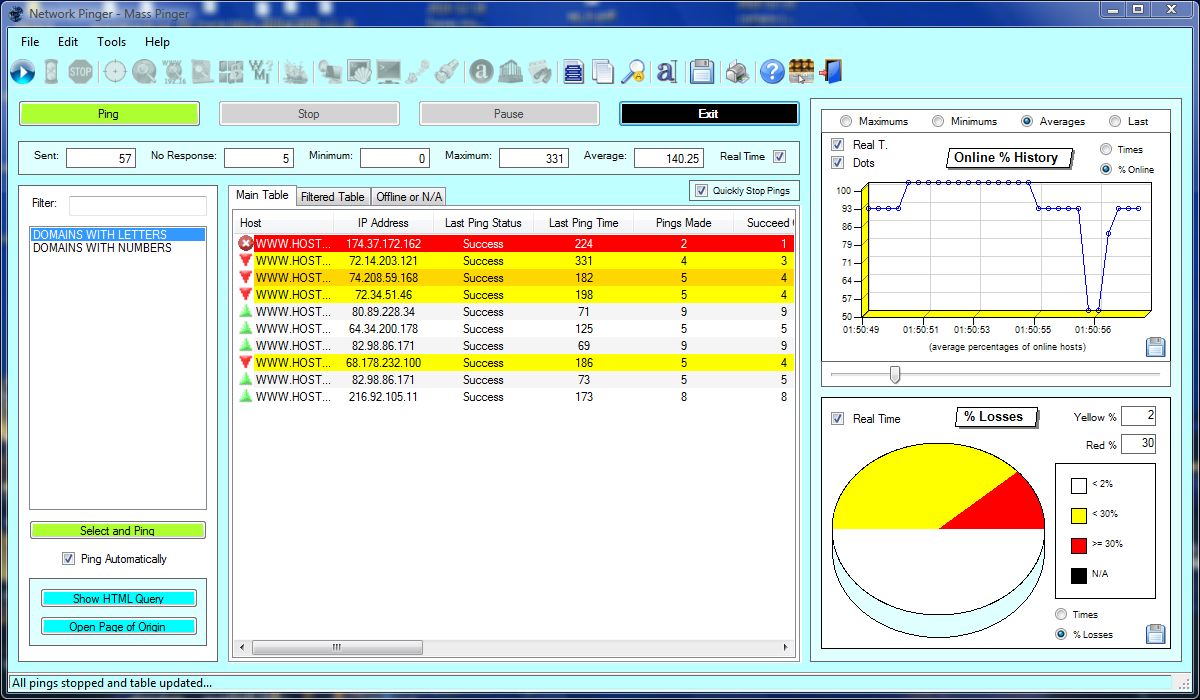
As we can see on the image above, absolutely all existing fields on the original table taken from the HTML page that was read, are found on the mass ping table on the Network Pinger software itself, including the column from which we've taken the hosts. Not only it allows us to identify the data that is associated to each host, as it also allows us to detect fail patterns on the several hosts.
Practical example of the use of the Extra Fields
As an example, lets imagine that we do some pings to all the modems inside a specific CMTS of a certain ISP company, and that we see that 5% of them are offline, which means that a number of about 500 modems are offline from a total of 10,000. If we sort the results of the mass pings on the last ping status column, separating those who have success responses as results from the failed ones, we'll end up having a big red area on the table full of all those hosts that failed to respond. Being sorted, lets now search for patterns on the offline hosts, and if we see that they are all in different cells, we could ignore that, but lets imagine that we see that they are all on the same cell? It would be strange and lets investigate further then, and lets imagine that we find out that they are all on a specific point, all in the same PD, which is the smallest distribution unit on the example above. This proves to be a quick way to detect patterns and failure on an entire network of hosts.
This way we just need to do a simple mass ping to some several thousand hosts, separate the online ones from the offline ones, and see if they all belong to the same sections or sub sections, and if so, we find errors very easily. By seeing that they all belong to the same section, lets now sort the table by section and see if all the hosts from the same section are down, or half of them, or almost none, etc. It is this way that this functionality of putting some extra fields taken from the original HTML table on the software's table can be very useful to us, not only to identify the hosts, as also for troubleshooting of errors and detecting local failures.
We can also detect some overcrowded areas in a big network very quickly, lets imagine that we sort a table of mass ping results by their response times and see that a certain section has all of its hosts with very high response times, etc. There are many ways to use the software to detect problems in a group of hosts, being those hosts many or just a few of them.
It is this way that sessions for automated browsing are created. It is explained the rest of the process, the way that the mass ping tool work, on the Mass Pinging Tool Tutorial, being the small tutorial in the current page made just to teach how to create and configure sessions that would allow the further using and taking advantage of the mass pinging functionalities in an automated way, or even in a non automated way but with navigation on web-page or inside documents.
|
|
|